How to Run a TestFlight Beta: 10,000 Testers in 30 Days
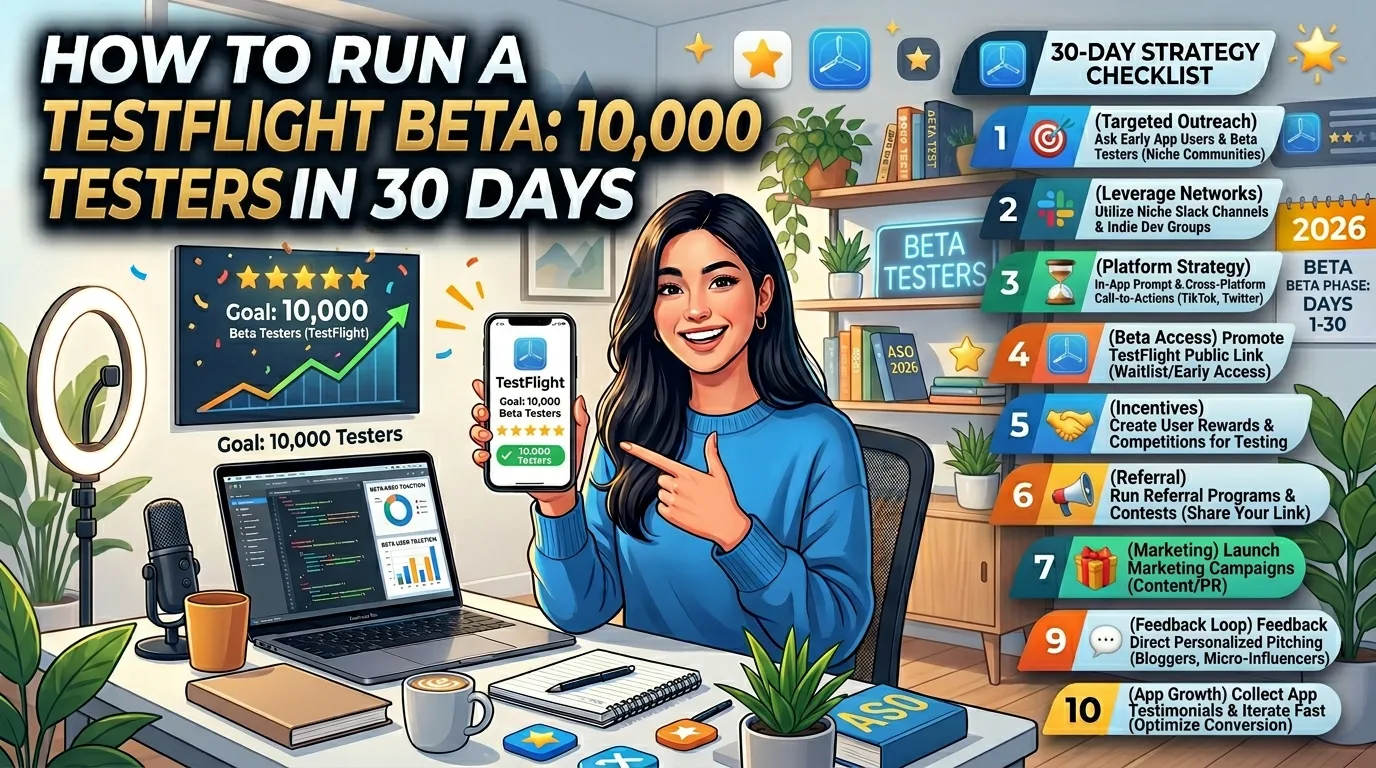
TestFlight is the most underused growth tool in indie iOS development. Apple gives you up to 10,000 external testers for free with the $99 Developer Program — a number most indie founders never come close to using because they treat TestFlight as a private QA tool instead of what it actually is: a free, frictionless way to put pre-launch software into thousands of real users' hands, collect feedback, build a launch-day waitlist, and stress-test your store listing before it counts. This is the operator-level guide to running a TestFlight beta that fills 10,000 tester slots in 30 days, what each step actually requires, and the mistakes that quietly kill most indie beta programs in 2026.
What TestFlight actually gives you
Apple's beta distribution platform isn't just "let some friends test the app." The real numbers in 2026:
- 100 internal testers. Members of your App Store Connect account. Instant access to new builds, no review required, used for your team and close collaborators.
- 10,000 external testers. Anyone with an Apple ID can be invited. Requires a one-time Beta App Review (24–48 hours for the first build, lightweight or skipped for later builds).
- Public invitation links. Share a URL on Twitter, Reddit, your landing page, or in newsletters. Anyone who clicks installs the beta without you having their email.
- 100 simultaneous builds. You can test multiple versions in parallel — A/B test features, experimental forks, or staging vs. production builds — without burning through a build slot.
- 90-day build expiry. Each uploaded build stays available to testers for 90 days. After that you push a new build and the timer resets.
- Crash reports and tester feedback in App Store Connect. Symbolicated crashes, annotated screenshots, written feedback — all centralized.
All of this is included in the standard $99/year Apple Developer Program. There is no separate fee, no per-tester cost, and no upgrade path you're missing.
Why 30 days is the right pacing
Filling 10,000 tester slots faster than 30 days usually means you've grabbed unqualified testers who never install. Filling them slower means you're losing the launch momentum that comes from a coordinated beta. Thirty days is the realistic sweet spot for an indie founder doing this alongside everything else they're shipping:
- Days 1–3: App Store Connect setup, first build upload, Beta App Review submission.
- Days 3–10: Internal testing with 5–20 close testers while waiting for and after Beta App Review approval.
- Days 10–20: Public link launch and first wave of external testers (target: 1,000–3,000).
- Days 20–30: Scale to 10,000 through community channels, content, and waitlist conversion.
The pacing also gives you time to ship build updates as feedback comes in — most useful betas push 2–4 builds in the 30-day window, refining based on what testers report.
Days 1–3: setup and first build
The setup steps are short but the order matters. Do them out of sequence and you'll wait days for Apple to unblock something:
- Confirm Apple Developer Program membership. You must be enrolled and have the Paid Applications agreement accepted in App Store Connect, even if your beta app is free.
- Create your app record in App Store Connect. Apps → "+" → New App. Pick the bundle ID, primary language, and SKU. You don't need final App Store metadata yet — TestFlight has its own separate metadata.
- Archive and upload your first build from Xcode. Product → Archive → Distribute App → App Store Connect. Apple's processing usually takes 15–60 minutes, occasionally longer.
- Fill out TestFlight test information. Beta app description, what to test, feedback email, contact info, marketing URL, privacy policy URL. This is required for external testing. If you skip it, you can do internal testing but external invites will fail.
- Create an internal testing group. Add yourself and your team members. Builds are immediately available to internal testers — useful for sanity-checking before Beta App Review.
- Submit the build for Beta App Review. Required only for external testing. Apple typically approves within 24–48 hours; subsequent builds for the same version often skip review or get expedited approval.
One subtle gotcha: you must create an internal group before you can create an external group. Apple's UI doesn't make this obvious, and skipping the internal group leaves you stuck.
Days 3–10: internal testing while waiting for review
Beta App Review takes 24–48 hours, sometimes longer for first submissions. Don't waste that window:
- Invite 5–20 close testers internally. Friends, fellow indie devs, anyone who'll actually open the app and tell you what's broken. Internal invites are immediate.
- Verify your beta description and feedback channels work. Make sure the email in your feedback field actually receives tester reports. Make sure your in-app feedback path (if you have one) sends notifications.
- Fix the first batch of bugs. Internal testers always find 5–15 issues that didn't surface in development. Ship a second build to clear them.
- Prepare your public link assets. Write the social copy you'll use, prepare 2–3 screenshots, and draft the email to your existing list (if any).
When Beta App Review approves, you'll get an email and the build status flips to "Ready to Test" for external groups. Now you can scale.
Days 10–20: public link launch and first 1,000–3,000 testers
The public link is the most efficient way to scale fast. Anyone who clicks it installs your beta — no email collection, no manual invitation. Where to share it:
- Your existing audience first. Email newsletter, Twitter/X followers, Discord, LinkedIn — wherever you've already built reach. Personal posts ("Built this thing, beta is live, link below") consistently outperform polished announcement posts.
- r/TestFlight on Reddit. A subreddit dedicated to TestFlight betas. Roughly 80,000 subscribers actively looking for new betas to try. Post your beta with a clear description of what you'd like tested. Easy 100–500 testers from one post.
- Indie communities. r/SideProject, r/iOSApps, r/IndieDev, IndieHackers, Hacker News (if newsworthy). Lead with the problem, not the product. Image post with a screenshot beats text-only.
- Niche communities related to your app. If you built a fitness app, post in fitness subreddits and Discords. Off-topic invites get less traction but higher quality testers who actually use the app.
- Your landing page. Replace the "Coming soon" button with "Try the beta on TestFlight" pointing to your public link. Anyone who finds your site organically can install immediately.
Set realistic tester criteria on the public link. App Store Connect lets you require minimum iOS version, specific device types, or other constraints. Don't over-filter — the goal is volume in this phase, quality in the next.
Days 20–30: scaling to 10,000
The first 3,000 testers are easy. Getting to 10,000 takes a different strategy because the obvious channels are tapped:
- Content marketing with the beta link. Write a blog post about what your app does and why you're building it. Include the TestFlight link. Share it on every relevant platform. Indie founders forget that long-form content recruits beta testers more efficiently than one-off social posts.
- Newsletter swaps. Find another indie founder with a similar audience and trade beta link placements in each other's emails. Small lists × multiple swaps adds up fast.
- Direct outreach to power users. Identify 20–30 people who have public profiles in your category — bloggers, YouTubers, podcasters — and send a personal note: "Built X to solve Y, would love your eyes on the beta if you have a minute." A quarter of them will check it out; some will write about it.
- App Store Connect tester criteria. If you've hit the cap on enthusiastic testers, broaden your criteria (lower minimum iOS version, add iPad support) to capture more of the install base.
- Ship build updates to keep testers active. Existing testers who see frequent updates stay engaged and tell their friends. A stagnant beta loses 30–50% of testers in the second week.
Realistic 30-day total: 8,000–12,000 testers if you do all of the above. Hitting the exact 10,000 cap isn't the goal — sustained engagement from 5,000 active testers beats 10,000 ghosts.
What good Beta App Review submissions get right
The first build's Beta App Review is where most indie betas stall. The rejection reasons are mostly preventable:
- Complete metadata. Beta app description, "what to test" notes, feedback email, and contact info all filled in. Empty fields trigger immediate rejection.
- Working sign-in (if required). If your app needs an account to test, provide a demo account in the "what to test" section. Apple's reviewers won't sign up themselves.
- No crashes on first launch. Apple's reviewers open the app on a clean device, often the latest iOS beta. If it crashes immediately, you're rejected. Test on a recent iOS version yourself.
- Privacy policy URL that resolves. The link in your TestFlight metadata must work. Broken links are auto-rejected.
- No hidden features behind unreleased functionality. If your app shows "Coming soon" everywhere, reviewers may flag it as incomplete. Make sure what's testable is actually testable.
If you do get rejected, the rejection details in App Store Connect usually point at the exact issue. Fix and resubmit; second submissions typically clear in under 24 hours.
What to actually do with 10,000 testers
The point of the 10,000 isn't bragging rights — it's specific outcomes you couldn't get any other way:
- Crash and bug discovery. Real users on real devices in real conditions surface bugs that no internal QA catches. 1,000 testers will find every memory issue your app has.
- Conversion and onboarding testing. Watch where testers drop off in your onboarding flow. TestFlight doesn't give you analytics directly, but if you've integrated an analytics tool, real-user data on flows beats any internal testing.
- Pricing and feature validation. If your app has paid features, watch which ones testers ask about. The features people ask "is this free or paid?" about are the ones worth charging for.
- Launch-day waitlist. Every tester is already an interested user. When you launch publicly, you have 10,000 people primed to download — a built-in launch boost.
- App Store reviews on day one. Testers who liked your app can leave a launch-day review the moment your app goes live. Apple won't let you ask for reviews during beta, but you can announce "We're live!" via the TestFlight tester email and many will leave reviews unprompted.
The mistakes that quietly kill indie betas
Recurring failure patterns across indie TestFlight programs:
- No clear "what to test" message. Testers who don't know what you want feedback on send generic "looks nice" responses. Be specific: "Testing the onboarding flow — does step 3 make sense? Is the sign-up too long?"
- Treating internal testers like external ones. Internal testers are great for fast iteration; they're terrible for "real user" signal. They know you, they know the app, their feedback is biased. Use them for QA, use externals for product judgment.
- Pushing too many builds. A new build every day overwhelms testers and they stop engaging. Two to four builds in 30 days is the sustainable rhythm.
- Ignoring tester feedback. Testers who don't see their feedback acknowledged disengage fast. Even a one-line "Thanks, fixing in next build" reply keeps them invested.
- Forgetting the 90-day expiry. Builds expire 90 days after upload. A beta that's been running for two months without a new build will start hitting expired-build errors. Push fresh builds on a regular cadence.
- Trying to monetize during the beta. TestFlight prohibits charging for beta apps. Don't gate features behind payment screens in beta builds — it's a Beta App Review rejection trigger.
Frequently asked questions
Do I need a paid Apple Developer account for TestFlight?
Yes. TestFlight is included with the $99/year Apple Developer Program, but you cannot use it on a free Apple ID. There's no free path to TestFlight for indie developers.
Can I charge testers for the beta?
No. TestFlight prohibits monetization of beta apps. You can describe a paid app in the beta description, but the beta itself must be free to install. In-app purchases work in beta in sandbox mode (no real charges).
How long does Beta App Review take?
The first build for a new version typically clears in 24–48 hours. Subsequent builds for the same version often skip review entirely or get expedited approval within hours. New version numbers reset this clock.
Can I revoke a tester's access?
Yes. In App Store Connect, you can remove individual testers from groups or disable the public link entirely. Removed testers immediately lose access to new builds.
Do TestFlight builds count toward App Store reviews or ratings?
No. The SKStoreReviewController prompt is suppressed in TestFlight builds, and any ratings testers leave don't apply to your App Store rating. Reviews only count once your app goes live publicly.
Can I test in-app purchases in TestFlight?
Yes, in sandbox mode. Testers can complete IAP flows without being charged, and your code can verify the receipts. You configure sandbox testing in App Store Connect's Users and Access section.
What's the difference between internal and external testers?
Internal testers are members of your App Store Connect team (up to 100), get instant access without review, and are best for QA. External testers are anyone with an Apple ID (up to 10,000), require Beta App Review for the first build, and represent real-user feedback.
Can I test on Mac, Apple Watch, or Apple TV?
Yes. TestFlight supports iOS, iPadOS, macOS, watchOS, tvOS, and visionOS. Each platform uses the same TestFlight infrastructure; testers install the platform-appropriate TestFlight app.
What happens when a build expires after 90 days?
The build becomes unavailable for new installs and existing testers see an "expired" message. You upload a fresh build, and testers can install the new version. The 90-day clock resets per build, not per app.
The bottom line
TestFlight at scale is one of the highest-leverage actions an indie iOS developer can take before launch. Ten thousand free testers, real feedback, a built-in waitlist, launch-day momentum — none of it costs more than the $99 you're already paying for the Developer Program. The mistake most indie founders make isn't doing TestFlight wrong; it's not doing it at all, or treating it as a small QA loop with 10 friends. Run it as the public-facing pre-launch it was designed to be, and you'll ship a better product to a primed audience.
Once your beta is humming, the next bottleneck is usually your App Store listing — testers convert to public-launch downloads only if your screenshots and listing copy do the work of selling. Our guide on App Store screenshots that convert covers what makes a listing actually install, and the first 10 reviews guide covers what to do the moment your beta testers turn into launch users.
Related posts
Make your App Store screenshots free
LaunchShots is a free, in-browser screenshot maker. No signup, no watermark.
Open the app →
Comments (0)